All the zero drain laser walls

This board is to show, discuss and archive useful combinator- and logic-creations.
Smart triggering, counters and sensors, useful circuitry, switching as an art :), computers.
Please provide if possible always a blueprint of your creation.
Post Reply
gGeorg
Filter Inserter
Filter Inserter
Posts: 387
Joined: Wed Jun 19, 2019 8:06 pm
Contact:

All the zero drain laser walls

Post by gGeorg »

It is often topic, as lasers are popular type of defence, but power draw is irritating tax. I found some laser walls bluprint which mostly are prototypes or doesnt work at all. So here is the dedicated topic for thinkerers.

-----------------------------------------------------------------------------------------------------------------------
Rules for Your wall to contribute:
- vanilla only
- 50 tiles sections with a roboport in the centre
- blueprint has "snap to grid + relative" option , so build a continuous wall is easy
- 15 laser towers (so we can measure efficiency)
- wake up of lasers have to be in 5s (or sooner) since biters arrives
- at least 12 laser towers have to sleep (power disconnected)
- after battle, fall to sleep interval must not be longer than 20s after last bitter bites the dust
- wall have to work reliably day or night regardless
----------------------------------------------------------------------------------------------------------------------

Here is my version with only 4 combinators, while all the rules above are valid.

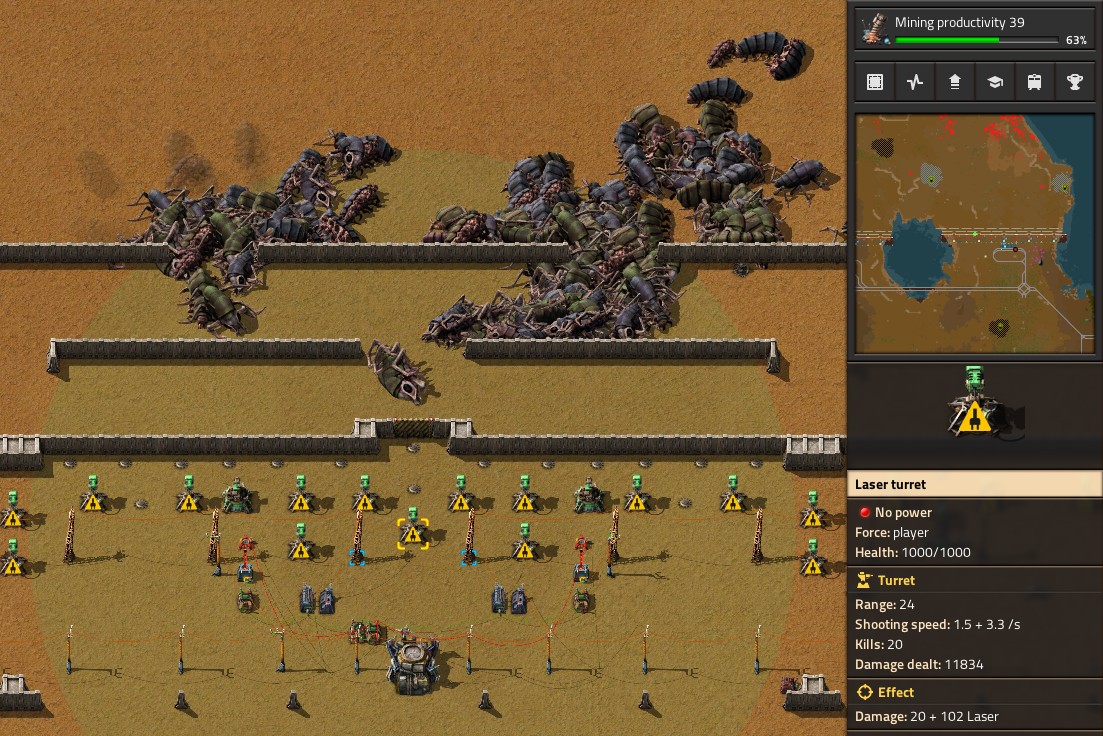
1. Zero drain Laser wall activated by machine-gun tower v2
Power switch is active when inserter feeds a clip to machine gun. MG consume clip in less than second, on top we could expect that some bulets are already used. Long hand Inserter has stack size one to ensure, fast reaction. Delay of waking up lasers is safely under 1second, so lasers can do the work. Combinators are One time clock works in a relay mode , clock is set for 300 ticks so it disconnects lasers after 5s of any inserter inactivity.
Behemot Spitter range is 16, MG turret 18 so it can safely detect any opponent. Thanks to smart wall maze approach biters have to come to the wall gap, where MG is focused, so the lasers wake up properly.
V2 update :
I also add mines, they are safely behind wall, they explode exactly when a biter attacks wall, becouse of proximity activation, :mrgreen: They are safely replaced by con-bot without risk being eaten. Also added a combinator to each request chest as safety feature for empty chest.
Image

Image
==================================
Laser_wall_activated_by_MG.txt
(2.99 KiB) Downloaded 114 times
==================================


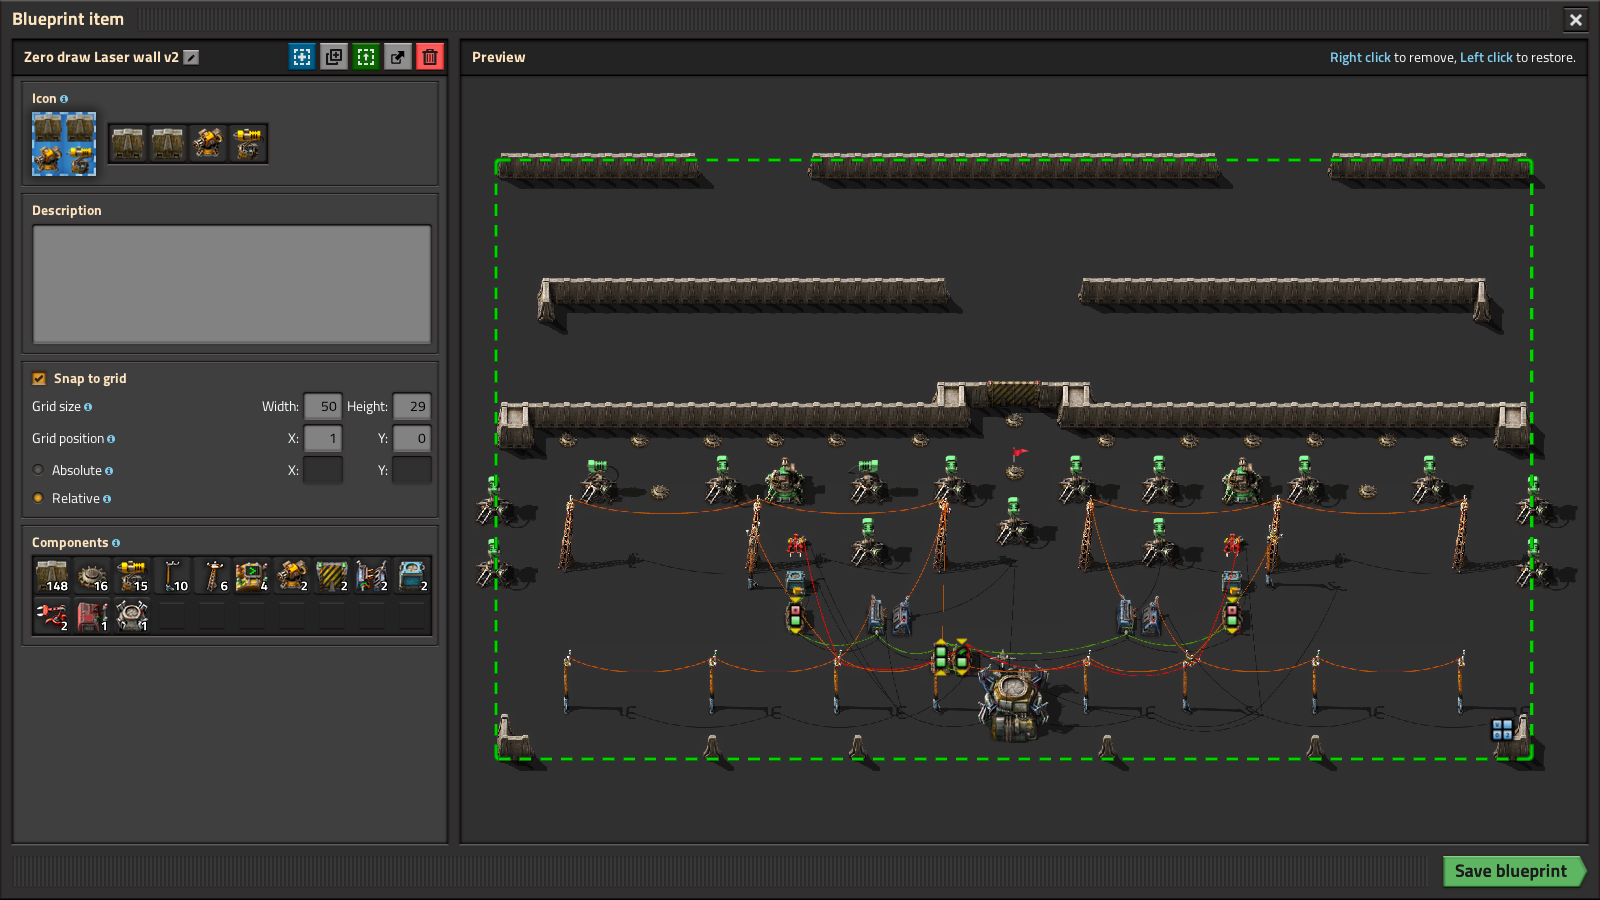
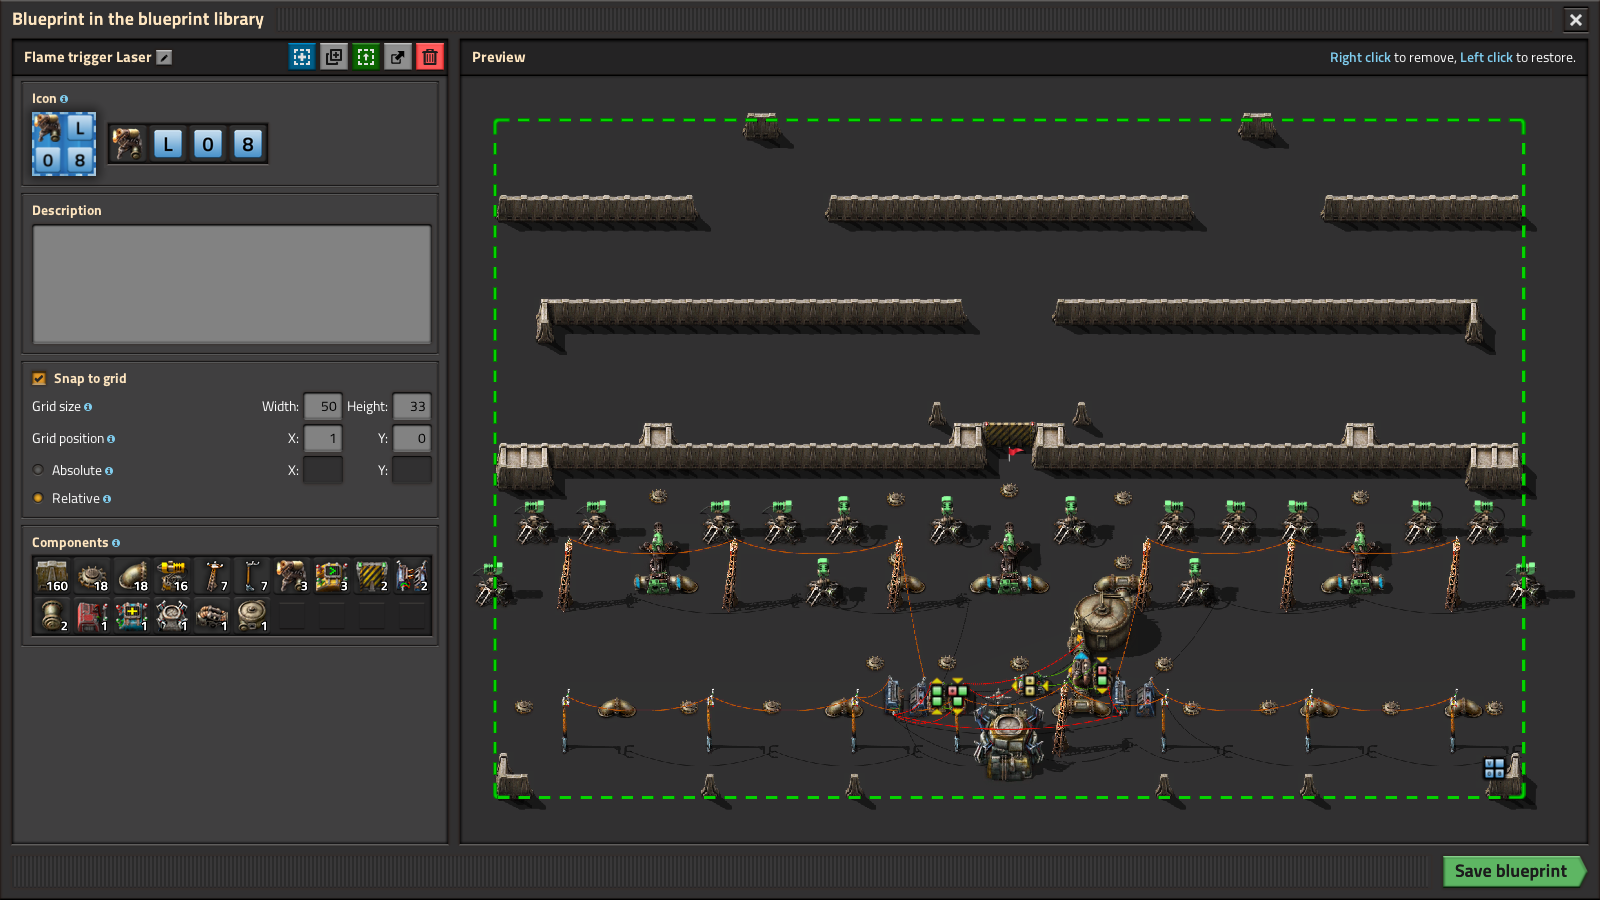
2. Zero drain Laser wall activated by flame tower

- Idea
Power switch is ON when the level of a liquid change or is too low.
- It uses 4 combinators like these 3 components
one decider >> low level of liquid safety sensor
one arithmetic >> signal inverter aka signal edge detector ( look for section Inverting amplifier)
two deciders >> relay ( I mean a real one) aka One time clock
- Process
In case level of a liquid is under 800 then safety sends "green_signal". It turns pump&power_switch ON.
"Liquid_level_low" signal to start pump is delayed by 2 ticks intentionally, to give pump enough time. Some older versions used SR latch or even a timer, but I found out that 3 ticks of pumping is enough and it costs zero combinators. Pump can deliver 25-200 units of liquids depends pressure in the input tube.
In case of liquid level change then edge detector sends a signal.
Multiplicating a signal by "minus_one" then send it on input of next combinator together with the original signal makes the trick. In case of steady level, two opposite signals negates each other so result is zero. In case input change then combinator signal is delayed (by one tick) so result is a delta signal. Delta signal has volume of a change per one tick.
Now the relay is activated
relay is modified so it get set (or refreshed) by any signal. Therefore signal of any type of liquid activates the clock, so blueprint is universal. When liquid level change (up/down) relay is set (refreshed) so it starts to count (again).
When flamers stop consume liquids, then edge detector stop sending signals, then relay release after 300ticks (5seconds), then power switch OFF. After battle, no combinator is counting. Everting is calm and OFF.

- Activation Delay
there is no real delay actually. Flamer range is 30 tiles, laser range is 24. So we have time of 6 tiles walking of a bug to activate towers, which is. Combinator logic takes 3 ticks, wake up flamer and consume 1 liquid takes 30-50 ticks. Lets round in up and say the activation of lasers is one second after the bug enter to range of flamer. e.g. when bug enter to the range of laser, power switch is ON already. Perfect.
Image
==================================
Laser_wall_activated_by_flamer.txt
(3.26 KiB) Downloaded 107 times
==================================
Last edited by gGeorg on Mon Dec 27, 2021 12:21 am, edited 10 times in total.

DoubleG
Burner Inserter
Burner Inserter
Posts: 9
Joined: Sun Dec 12, 2021 6:02 pm
Contact:

Re: All the zero drain laser walls

Post by DoubleG »

Awesome idea. cheers for pointing it out :)

adam_bise
Filter Inserter
Filter Inserter
Posts: 346
Joined: Fri Jun 08, 2018 10:42 pm
Contact:

Re: All the zero drain laser walls

Post by adam_bise »

A typical laser heavy perimeter wall with other weapons.
1.png
1.png (243.92 KiB) Viewed 7566 times


Sleep / wake control via light oil. Set to ~20s. The light oil tank must be connected to flamethrower turrets. Light oil must be supplied to the tank via a pump on the switched perimeter power grid. This way, the value of light oil will differ from the sleeping combinator. If very long walls are used and additional pumps are needed, segment the pipes, power, and create a new control unit with a new light oil tank. If the light oil in the tank drops to zero, the system will fail. If this happens, or if you are trying to initialize the system, ensure that light oil is present behind the perimeter pump and temporarily cross the switches with a copper wire, or put in a manual switch, etc.

The left pole is facility power. The right pole is for perimeter.

Place a single red wire on belt.
2.png
2.png (1.24 MiB) Viewed 7566 times


It doesn't wait for 20 seconds after the last biter dies, however. Instead, it waits for 20 seconds after light oil is used by a turret, or while the fluid level is equalizing.

The benefit of this approach is you can use it to power off an entire outpost. I use parallel switches with T>0 etc.. to wake on trains and also wake on attack, or remain awake until production is idle, and so on.

gGeorg
Filter Inserter
Filter Inserter
Posts: 387
Joined: Wed Jun 19, 2019 8:06 pm
Contact:

Re: All the zero drain laser walls

Post by gGeorg »

adam_bise wrote:
Fri Dec 24, 2021 10:12 pm
Sleep / wake control via light oil.
Hello, thank you for your contribution. It is nice idea to use a belt as a delay timer. A bit more expensive than 2 combinators ;) , but it looks great.
Could you update your post to meet criteria of the topic ? Instead of a test bed, make it a finished blueprint. Looking forward yours result.

BTW. I have just updated my first post, added Laser wall triggered by flamers.

Pascali
Fast Inserter
Fast Inserter
Posts: 170
Joined: Wed Aug 23, 2017 8:24 pm
Contact:

Re: All the zero drain laser walls

Post by Pascali »

Has it to be the exactly walling? Or only quite similar?

gGeorg
Filter Inserter
Filter Inserter
Posts: 387
Joined: Wed Jun 19, 2019 8:06 pm
Contact:

Re: All the zero drain laser walls

Post by gGeorg »

Pascali wrote:
Mon Dec 27, 2021 2:48 am
Has it to be the exactly walling? Or only quite similar?
It is about towers and defence. If you developed a system without actual stone wall, it belongs here. So yes, similar is ok.
Just check the first post for
"Rules for Your wall to contribute" there is nothing about the number of stone wall bricks, but lasers ;)

Pascali
Fast Inserter
Fast Inserter
Posts: 170
Joined: Wed Aug 23, 2017 8:24 pm
Contact:

Re: All the zero drain laser walls

Post by Pascali »

I have three lines of laser-turrets withouth any spaces between them - in the corners a lot more. But just 2 straight walls - and the biters are destroying this defense with every attack a little bit more.

Tertius
Filter Inserter
Filter Inserter
Posts: 650
Joined: Fri Mar 19, 2021 5:58 pm
Contact:

Re: All the zero drain laser walls

Post by Tertius »

Here is my laser defense wall. Laser turret only.
I tried to keep it as simple as possible, so I tried to use as few different types of items, and I tried to require as few supplies as possible. I went through countless iterations with animal testing in my lab, so I would say it is quite real game world ready (although I didn't use it yet in my base).


Image of 4 wall sections:
wall section 2.jpg
wall section 2.jpg (727.86 KiB) Viewed 7346 times
It contains 2 notable things:
  1. Laser turret only. Laser drain is 24kW per 10 turrets.
    The center turret in front of the roboport is the detector. It is connected to an accumulator, which is connected to the main power grid through the middle power switch. The power switch reads the accumulator charge and switches on if the charge is below 100.
    If the turret is idle, it pulls 24 kW from the accumulator, so the charge is 100% for about 13 ticks, then 1 tick at 99% (reloads from main power grid), then 100% again for about 13 ticks, and so on.
    If the turret is firing, it pulls 300 kW from the accumulator, so the charge toggles between 100% and 99% every tick.
    The left combinator is adding up the accumulator charges as long as the sum is below or equal 400. If the sum (A) exceeds 400, it begins to sum up again.
    If the turret is idle, A goes up to 100+100+100+100=400 (or 399, if one recharge tick happens).
    If the turret is firing, A goes up to 100+99+100+99=398.
    This way A can be used as direct indicator if an enemy was detected. If A=398, the turret fired, so an enemy was detected.
    The right combinator is counting from 0 to infinity (D). It counts if the input value A is not equal to 398, and it resets if A=398.
    Finally, the right and left power switches both activate if D < 1200. So the inactive turrets activate for 1200 ticks (20 seconds) after the detector turret fired for the last time.
    There are 2 power switches, because they not only power their own wall section but also half of the neighboring wall section to have enough fire power at the left and right end even if the neighboring section doesn't wake up.
    I added a speaker that will beep if an enemy was detected.
    • wall setup
      This is for what the animal testing took place.
      The blind spot of the detector turret is kind of walled off. Enemies are made to go around the walls to get into range of the detector turret while still keeping their distance.
      The single walls are placed teeth-like to exploit the enemy path finding and make them struggle to get through while being shot. All is placed in a way that enemies will try to get around obstacles instead of biting through. Placement and size of all gaps is intentional, horizontally as well as vertically. The field in front of the detector turret is empty, because enemies simply don't cross this field.
      Tested with biters as well as spitters. In rare cases, single behemoth spitters might get near enough to spit the turrets, so repair kits are provided by the robots. And in rare cases, single behemoth biters might get down to the last wall and get one or two bites. Smaller versions are usually shot in the gaps of the outer and first inner wall.

      Changing the general layout of the walls might suddenly make the enemies want to bite through walls where they previously tried to walk around. This is the enemy pathfinding. Especially if you connect the wall with the environment to the left or to the right, unexpected wall damage can take place. It might help if you just leave 1 gap between environment (water, cliff) and the wall section. However, if you supply repair kits, replacement walls, replacement turrets and replacement robots(!), this is an invincible wall.

      A 3-tile gate is included for a tank to go outside. Don't worry if you bump into the door - the robots will come with their repair kits, and they even have replacement gates.
    blueprint.jpg
    blueprint.jpg (435.86 KiB) Viewed 7346 times
    Setup notes:
    • main power grid
      The grid width of the big power pole (30) is not compatible with the wall section grid (50). It aligns again only after 3 wall sections / 5 power poles. The blueprint contains a starting big power pole. Use this placing for the first wall section and set the power poles manually at maximum distance, and every wall section will get its power automatically.
      The main power grid MUST contain real generators (steam engines or turbines), because accumulators from a solar power plant will not recharge the detector accumulator. If the detector accumulators are not properly recharged, the discharge is seen as incoming enemy by all detectors and all the wall sections will activate. This is probably the only flaw of this wall, because it increases the severity of brownouts. I suggest a master switch that will detect a brownout and disconnect all walls.
      • artillery turret setup
        To fight enemy nest creep near your base, keep the artillery turret on every 8th wall section. Artillery range is 224 (diameter: 448), so you need a turret every floor(448/50)=8 wall sections. The turret is supplied with the blueprint, so don't forget to remove it if is not needed, and remove the inserter that is feeding it. Keep the logistic chest, it will help distribute supplies across the whole wall.
        • radar setup
          Radar has a grid size (7 chunks = 224 tiles) not dividable by the wall section grid size (50). An acceptable radar placement is every 225 tiles, within a chunk. Only once every 32 wall sections one chunk will not be scanned.
          The blueprint contains 2 radars. Use the right radar for the 1st wall section, use the left radar for the 6th wall section, then the right radar again for the 10th and so on. If you followed the note for the placement of the big power poles, all radars are powered fine. I added radars despite their energy cost, because I want to see all the enemy developement around my base, as well as detecting new resource fields far outside.
        Work in progress:
        This is only a straight wall. If you need a corner, additional work is required. Just rotating the blueprint and patching a corner isn't sufficient. A corner needs careful testing, probably rounding off, then again animal testing if it works out. That's next in this project.

        Wall section blueprint:


        Complete screenshot:

        This is the blueprint with 4 wall sections and extended to the right with proper placement of the next radars and artillery turrets, as well as a power supply in my lab. It's essentially what I used while developing.
        everything.jpg
        everything.jpg (1.07 MiB) Viewed 7346 times
        everything-blueprint.txt
        (72.73 KiB) Downloaded 139 times
        out2.mp4
        (20.56 MiB) Downloaded 162 times

        gGeorg
        Filter Inserter
        Filter Inserter
        Posts: 387
        Joined: Wed Jun 19, 2019 8:06 pm
        Contact:

        Re: All the zero drain laser walls

        Post by gGeorg »

        Tertius wrote:
        Wed Dec 29, 2021 2:04 am
        Here is my laser defense wall. Laser turret only.

        The main power grid MUST contain real generators (steam engines or turbines), because accumulators from a solar power plant will not recharge the detector accumulator. If the detector accumulators are not properly recharged, the discharge is seen as incoming enemy by all detectors and all the wall sections will activate. This is probably the only flaw of this wall,
        Thank you for contribution. I am glad you noticed a trick of 2 wings switching. I fond it some years ago, all those versions here on forum, switches only part where detection happened, but those pesky bugs, could come on the edge of section and disaster happened. :D

        Your effort to make a soft wall, is amazing. I tried to make some regularly irregular pattern for several hours, to make them walk, but yours work better. I will borrow it. Do you posses some maths secrets about pathing used?
        One day I watched a document about 1st world war and methods of entrenchments, most successful was "a soft wall". Technique allowing enemy come to your territory and die while walking.

        Well, regarding logic, ... . You made it easy for you by setting yourself a condition that power grid is powered only solid power-plant. That is a bit cowardice. :roll: It works, I admit but is tooo easy. In fact you need to add : "Power grid must be powered by only solid power-plant and do not use batteries for control. For example cooperation coal and nuclear plant. That way, you make sure that the discharge of battery in the grid, do not exist. So this way a lot of problems disappeared. Best recommendation would be, make a power grid dedicated only for powering a wall.

        It is certainly a nice trick, connect wall only to power-plant, but not to solars. However, In the first topic I wrote : Wall have to work, thru day and night. I thout, wall is powered by solars&batteries so you need to solve night.

        So, conclusion:
        Your pattern of soft wall is perfect. It is so perfect that devs migh see it and develop a brand new pathing :D
        Laser wall switched off in case of inactivity is doable by dedicated power grid. But laser wall powered by solars is still a myth.

        Tertius
        Filter Inserter
        Filter Inserter
        Posts: 650
        Joined: Fri Mar 19, 2021 5:58 pm
        Contact:

        Re: All the zero drain laser walls

        Post by Tertius »

        Thanks for your praise of my soft wall.

        However, I'm more proud of the simple 2-combinator setup handling the detector turret. This is what will be duplicated all around your base. Your request for operation on battery power is a bit unfair, or at least out of scope, so I decided to ignore it (cough, cough), as well as your rule to have 15 laser towers (I provide 10, and it's sufficient in my opinion). The wall itself works perfectly - on solid power. For the night, one can provide a separate power plant just for the wall and connect it with some circuitry. That module would be a new puzzle to solve, but independent to the actual wall puzzle. As I wrote: the wall has some claims for the power supply. That's its price, while its benefits is kind of simple supply demand beyond electric power.

        In the demo video, you see enemies created at 0.89 evolution. Just no behemoths, they start at 0.9. For my tests, I placed them manually (not in the video). Research is all maxed, but no endless research. With earlier bases and not all laser damage bonuses researched you also get much smaller enemies due to lower evolution, so you should still be fine.

        The wall setup is pure trial and error. Took me two evenings. I didn't even use debug overlays (now that I write about it, I remember there might exist such kind of pathfinding overlay).
        Screenshot 2021-12-29 151921.jpg
        Screenshot 2021-12-29 151921.jpg (206.26 KiB) Viewed 7278 times
        I started with walling off the blind spots of the detector turrets (outside the green field), so the enemies had to walk to a gap that is covered by the turret (green field). One single long wall was too long, so I made a hole in the middle. Was still attacked, so I made 2 holes instead of 1, and the wall wasn't attacked any more. This got me to the outer wall structure. Placing the next long walls within the blind spot came next. Too near to the top walls, and they got attacked.

        The spikes came last. I experimented with 3-part wall segments, but in the end the most efficient were as many holes as possible, because enemies stalled in them.
        Their general behavior is this: Coming near a military structure (turret), they choose a target. A firing turret seems to be priority, but I don't know exactly. This choosing takes place outside the outer wall. Now the pathfinding creates a path to the target. A path is probably a list of tiles to walk over. However, enemies don't walk over the middle of a tile, instead they walk a straight line. Important is only they visit some part of a path tile.
        It seems they have collision boxes so big they need to position themselves in front of a 1 tile gap to get through. It seems they need to try and find the correct spot to get through that gap. It gets worse (for them) if a spike is directly below the gap. This seems what make them struggle to get through, and this is the strength of the setup.

        It also happens that if items are placed too near vertically, they got attacked. So the distance between the 2 inner wall/spike formations. The middle line is placed just outside the spitter spit distance to kill as many spitters before they get near enough to spit.

        It happens from time to time that single stragglers forget their initial turret target and start to attack the wall randomly after the turrets are powered down. If this is in the blind spot of the detector turret, they bite the wall and the worker robots repair at the same time. This continues endlessly except with behemoth biters, because only behemoth biters are strong enough to bite faster than repair robots will repair. Eventually, these get into range and get shot. Spitters losing their targets will destroy the repair robots with the acid puddle, so walls get destroyed, so they get in range faster. If this is a real threat, and if the blind spots are too big, is yet to see in a real base with long defense lines.

        gGeorg
        Filter Inserter
        Filter Inserter
        Posts: 387
        Joined: Wed Jun 19, 2019 8:06 pm
        Contact:

        Re: All the zero drain laser walls

        Post by gGeorg »

        Tertius wrote:
        Wed Dec 29, 2021 3:07 pm

        It seems they need to try and find the correct spot to get through that gap. It gets worse (for them) if a spike is directly below the gap. This seems what make them struggle to get through, and this is the strength of the setup.

        It also happens that if items are placed too near vertically, they got attacked. So the distance between the 2 inner wall/spike formations. The middle line is placed just outside the spitter spit distance to kill as many spitters before they get near enough to spit.

        It happens from time to time that single stragglers forget their initial turret target and start to attack the wall randomly after the turrets are powered down. If this is in the blind spot of the detector turret, they bite the wall and the worker robots repair at the same time.
        That is nice catch, I thout they want gap wider. When I did it, they stopped biting, and start walking. But probably they only want certain lenght of wall. Hmmm. That trick where they stop on a spike for a second after the gap, is valuable. My flame tower loves it.

        My soft wall is less efficient (they go thru faster) but is battle tested for about hundred hours. No single straglers there. Maybe, that flamers have just bigger range. Or perhaps make it so, the laser can reach over the last wall, in all cases. For this purpose, two sensor towers would be better.

        Tertius
        Filter Inserter
        Filter Inserter
        Posts: 650
        Joined: Fri Mar 19, 2021 5:58 pm
        Contact:

        Re: All the zero drain laser walls

        Post by Tertius »

        Bad news (for me), it definitely happens that spitters will stop outside and attack the outer wall from their maximum attack range. To reach them, the outer wall must not be farther away than laser attack range - spitter attack range, which is 24 - 16 = 8. It also happens if the wall parts are only as short as 8.
        I also have to add a 2nd detector turret as you said, gGeorg.
        Screenshot 2021-12-31 030818.jpg
        Screenshot 2021-12-31 030818.jpg (578.32 KiB) Viewed 7179 times
        This is what is left from the soft wall:
        Screenshot 2021-12-31 024658.jpg
        Screenshot 2021-12-31 024658.jpg (577.11 KiB) Viewed 7179 times
        On the other hand, it proved still good enough to be not overrun by the huge groups that gathered, this time including behemoths, if I place 10 biter nests and 10 spitter nests and 20 worms and let artillery fire constantly. Repair kits required, and seldomly a replacement laser turret, but only for the largest groups you normally will not encounter, if you prevent nest creep in the first place.

        It also may be that I am overdesigning things and a simple gallery of turrets with a single wall with a few spikes in front of it is sufficient. And no circuits, just enough solar panels plus batteries and endure the drain. Yes. Excel spreadsheet says costs to build solar panels plus batteries normalized to 240 kW (10 turrets) are not significantly more expensive to build than the circuitry and switches and additional power poles. Only about double the copper and only 44% more iron. I think that's not worth all the hassle. Just build panels plus batteries instead. Or one more nuclear reactor. Hmpf.

        gGeorg
        Filter Inserter
        Filter Inserter
        Posts: 387
        Joined: Wed Jun 19, 2019 8:06 pm
        Contact:

        Re: All the zero drain laser walls

        Post by gGeorg »

        The iron poles you used are expensive, why do I use wooden ? ;)

        Spitters might start to attack from far, in case the wall appears not broken enough. That was the one of reasons for my wide gaps. All bug believe, it is broken wall, so they move quietly. Most probably spitters x bitters has different evaluation for valid targets.

        Definately not over engineered.
        Spoiler
        I made some test today with my wall improved by "narrow gap and spike" . It worked. I make them more these "traps" to prevent attacks. Even there is more small holes, it make more slowdown than one wide gap.


        On top I added one nasty trick. On the farthest edge of construction robo area, added single loose line of mines. Like 6 tiles gap between mines. It do not stop a column, but disperse/disrupt the formation. I admit it is not very efficent, becouse power consumed by robots to replace mines is higher than savings of automation/switch off of laser. But it is nice technique for any wall and fun to watch. :twisted:

        Qon
        Smart Inserter
        Smart Inserter
        Posts: 2091
        Joined: Thu Mar 17, 2016 6:27 am
        Contact:

        Re: All the zero drain laser walls

        Post by Qon »

        I did this 3 years ago.
        Waking up and going back to sleep are both instant.
        The blueprint book includes corners.
        There's a "main" piece that can be used to to switch from "auto" to "on".
        The blueprint snaps to chunks.
        It looks slightly better in the actual blueprint than the pictures, which are a bit outdated with some slightly non-straight lines of power poles.

        gGeorg
        Filter Inserter
        Filter Inserter
        Posts: 387
        Joined: Wed Jun 19, 2019 8:06 pm
        Contact:

        Re: All the zero drain laser walls

        Post by gGeorg »

        Qon wrote:
        Sun Feb 20, 2022 7:24 pm
        I did this 3 years ago.
        Waking up and going back to sleep are both instant.
        The blueprint book includes corners.
        There's a "main" piece that can be used to to switch from "auto" to "on".
        The blueprint snaps to chunks.
        It looks slightly better in the actual blueprint than the pictures, which are a bit outdated with some slightly non-straight lines of power poles.
        Yes, I found it. Only problem is, it doesnt work.

        Qon
        Smart Inserter
        Smart Inserter
        Posts: 2091
        Joined: Thu Mar 17, 2016 6:27 am
        Contact:

        Re: All the zero drain laser walls

        Post by Qon »

        gGeorg wrote:
        Sun Feb 20, 2022 8:10 pm
        Yes, I found it. Only problem is, it doesnt work.
        Yes it does. I made it, of course it works. You used it wrong. You didn't bother reading the instructions. It's very simple:
        Did you remember to connect it to a power network? Correctly?
        Did you remember to put down exactly 1 controller unit in the connected wall?

        gGeorg
        Filter Inserter
        Filter Inserter
        Posts: 387
        Joined: Wed Jun 19, 2019 8:06 pm
        Contact:

        Re: All the zero drain laser walls

        Post by gGeorg »

        Qon wrote:
        Tue Feb 22, 2022 8:36 pm
        gGeorg wrote:
        Sun Feb 20, 2022 8:10 pm
        Yes, I found it. Only problem is, it doesnt work.
        Yes it does. I made it, of course it works. You used it wrong.
        No it doesn't. At least here in Europe, It doesn't work at all.

        Qon
        Smart Inserter
        Smart Inserter
        Posts: 2091
        Joined: Thu Mar 17, 2016 6:27 am
        Contact:

        Re: All the zero drain laser walls

        Post by Qon »

        gGeorg wrote:
        Thu Feb 24, 2022 5:38 pm
        Qon wrote:
        Tue Feb 22, 2022 8:36 pm
        gGeorg wrote:
        Sun Feb 20, 2022 8:10 pm
        Yes, I found it. Only problem is, it doesnt work.
        Yes it does. I made it, of course it works. You used it wrong.
        No it doesn't. At least here in Europe, It doesn't work at all.
        Yes it does. I'm also in Europe so you are proven wrong.

        Post Reply

        Return to “Combinator Creations”