[GUIDE] How to style buttons with images on them.

Place to post guides, observations, things related to modding that are not mods themselves.
Post Reply
JasonC
Filter Inserter
Filter Inserter
Posts: 448
Joined: Tue Mar 22, 2016 3:05 am
Contact:

[GUIDE] How to style buttons with images on them.

Post by JasonC »

Important: As of 0.12.31, the hacked checkbox-as-buttons (using icon as check image) do not render the same; the background is rendered incorrectly and the check images perform the alpha-cropping before scaling. Also the check images aren't centered, some issue with the scaling. Will update as soon as I get my head around it and the game updates settle down. Also, there is a proper image button widget coming in 0.13.

The purpose of this is to illustrate how to create buttons and checkboxes with images on them, and point out some of the game's various style quirks. It's the result of a lot of guessing and experimenting. Credit should also go to Macros, who really figured a lot of this out, and anybody who wrote a mod with buttons with graphics, because I probably looked at your code at least twice.

There are some things here that might be unnecessary or could be improved. If you know of anything please share. Right now this represents my best guesses. Also if anything below is confusing, know that it's not you. It's just really confusing. There isn't really any documentation for element-specific styles and behaviors.

This is an intermediate-level guide that assumes you know how to work with styles, create GUI elements, and handle GUI events. I discuss styling only (for the most part).

This was written against Factorio 0.12.29.

Before going into code, here is a summary of a few quirks. File these away so that the stuff below makes more sense. They'll be explained in more detail later.
  • Buttons:
    • Always automatically scale images.
    • Can have left click sounds (not covered here).
  • Checkboxes:
    • Never automatically scale images.
    • Can't have left click sounds.
    • Inexplicably offset images vertically depending on checkbox size (shift must be used to correct).
    • Can't center background images automatically.
  • Both:
    • Button / checkbox size must be 2 pixels larger than image in both directions to prevent cropping or scaling.
    • Backgrounds and borders are not separate from the image (although check marks are their own image). They must be part of the image. However, you can hack a checkbox to overlay an arbitrary image on top of an existing background/border image (covered below).
Another thing to be aware of is the game appears to automatically crop all transparent borders off of images before applying any other operations to them. For example, for the built-in explosive shell, the game will crop out the areas I've highlighted in red before rendering the image (and yes that extra white column on the left is accurate, the game's explosive shell graphic has a stray very-transparent pixel over there):

Image

The consequence of this is that it becomes very difficult to center transparent images on GUI elements: Even if you center the image in your actual image file, the game will crop it and you'll still have to adjust the position manually with 'shift'.

Because of these oddities, there are times when you might have to hack checkboxes into push buttons. This will be covered.

Resources

In the examples below we'll be using the following graphics (images came from Factorio and https://www.iconfinder.com, I composited them). The built in explosive shell, 32x32, with a transparent background:

Image

A basic duck, 32x32, with no transparency:

Image

An... express duck. A full set of tiles (default, hover, click, disabled), 128x32 total, with no transparency:

Image

A "no" sign, 32x32, with a transparent background:

Image

And also all the graphics and example code here can be found in a functioning mod at https://github.com/JC3/ImageButtonExample.

Buttons

So getting right into things, here is an example of a basic button style with an image on it:

Code: Select all

data.raw["gui-style"].default["trans-image-button-style"] = {
	type = "button_style",
	parent = "button_style",
	width = 34,
	height = 34,
	default_graphical_set = {
		type = "monolith",
		monolith_image = {
			filename = "__image-button-example__/graphics/explosive-cannon-shell.png",
			width = 32,
			height = 32
		}
	},
	hovered_graphical_set = {
		type = "monolith",
		monolith_image = {
			filename = "__image-button-example__/graphics/explosive-cannon-shell.png",
			width = 32,
			height = 32
		}
	},
	clicked_graphical_set = {
		type = "monolith",
		monolith_image = {
			filename = "__image-button-example__/graphics/explosive-cannon-shell.png",
			width = 32,
			height = 32
		}
	},
	disabled_graphical_set = {
		type = "monolith",
		monolith_image = {
			filename = "__image-button-example__/graphics/explosive-cannon-shell.png",
			width = 32,
			height = 32
		}
	}
}
Important points about that example, which you'll need to apply to your own code:
  • The size of the button should be 2 pixels larger in both directions than the sizes of your images, because there is a 1-pixel border around the outside of buttons. In this example since we're using 32x32 images, we make 34x34 buttons.
    • Monoliths have 4 undocumented border properties: top_monolith_border, bottom_*, right_*, left_*. These have no apparent effect on internal borders.
    • GUI elements have 4 documented padding properties. These affect the text on GUI elements, but have no apparent effect on internal borders and do not seem to affect the images.
  • Note that buttons use *_graphical_set for their images. This is different than checkboxes (see below).
  • Here we are using a "monolith", which is basically just a plain old image. There is also a "composition", this can be used for defining frames and borders for empty / text buttons (I will add more info when I have time, for now see the forum post below), although you cannot use them in checkboxes and cannot overlay your own images on top -- these "monolith", "composition", etc. image types only apply to *_graphical_sets, which checkboxes do not use.
  • The image will always be scaled to fill the button (after the auto-cropping is done).
    • The 'scalable' property has no effect.
    • Setting "scale=1" has no effect.
    • There are undocumented *-no-scale priority values. They have no effect.
  • I have left the priority values off because I don't actually know what they do. Also the wiki implies that they apply to animations, although the game's built-in style code uses them liberally on still images.
With all that in mind, the above code will produce a button that looks like this:

Image

As you can see you have no control over the stretching. Because of this, you really can't use images with transparent backgrounds on buttons, unless the button is the same size as the auto-cropped image, of course. That said, if you use the above example with an image that does not have transparent edges, you can get a pixel-accurate button. For example, using the basic duck image produces:

Image

You may also notice that the above shows the same image for default, hover, click, and disabled states. If you want to provide visual feedback on those states you'll have to use a different image for each. This is where our express duck tiled image comes in handy. The example below uses that image. It is the same as above except I've added the "x" parameter to each image. In image styles, the "x" and "y" parameter specify where in the image the graphic should be taken from; this can be used to provide multiple images in a single file. They both default to 0 if not specified:

Code: Select all

data.raw["gui-style"].default["tiled-image-button-style"] = {
	type = "button_style",
	parent = "button_style",
	width = 34,
	height = 34,
	default_graphical_set = {
		type = "monolith",
		monolith_image = {
			filename = "__image-button-example__/graphics/tiled-full.png",
			width = 32,
			height = 32,
			x = 0 -- x offset of default image in our tiled graphic
		}
	},
	hovered_graphical_set = {
		type = "monolith",
		monolith_image = {
			filename = "__image-button-example__/graphics/tiled-full.png",
			width = 32,
			height = 32,
			x = 32 -- x offset of hover image in our tiled graphic
		}
	},
	clicked_graphical_set = {
		type = "monolith",
		monolith_image = {
			filename = "__image-button-example__/graphics/tiled-full.png",
			width = 32,
			height = 32,
			x = 64 -- x offset of click image in our tiled graphic
		}
	},
	disabled_graphical_set = {
		type = "monolith",
		monolith_image = {
			filename = "__image-button-example__/graphics/tiled-full.png",
			width = 32,
			height = 32,
			x = 96 -- x offset of disabled image in our tiled graphic
		}
	}
}
And that will produce a button that looks like this by default, and gives visual feedback when you hover / click (I'm not going to make an animation out of it, you get the idea):

Image

That pretty much covers it for buttons. They're very straightforward, but you will be stuck with scaled images. If you don't mind, or if you just make all your images have non-transparent edges (and make them the same size as the button to eliminate scaling, if you want), then you'll be satisfied with them.


Checkboxes

Checkboxes basically have two uses, as far as I'm concerned: 1) An actual checkbox, 2) A push button to workaround the scaling limitations of the built-in buttons.

So first, an example of a basic checkbox with a custom checkmark graphic:

Code: Select all

data.raw["gui-style"].default["trans-image-checkbox-style"] = {
	type = "checkbox_style",
	parent = "checkbox_style",
	width = 34,
	height = 34,
	default_background = {
		filename = "__image-button-example__/graphics/explosive-cannon-shell.png",
		width = 32,
		height = 32,
		shift = { 0, -8 }
	},
	hovered_background = {
		filename = "__image-button-example__/graphics/explosive-cannon-shell.png",
		width = 32,
		height = 32,
		shift = { 0, -8 }
	},
	clicked_background = {
		filename = "__image-button-example__/graphics/explosive-cannon-shell.png",
		width = 32,
		height = 32,
		shift = { 0, -8 }
	},
	disabled_background = {
		filename = "__image-button-example__/graphics/explosive-cannon-shell.png",
		width = 32,
		height = 32,
		shift = { 0, -8 }
	},
	checked = {
		filename = "__image-button-example__/graphics/no.png",
		width = 32,
		height = 32,
		shift = { 0, -8 }
	}
}
Important points about that example, which you'll need to apply to your own code:
  • As with buttons, the size of your checkbox should be 2 pixels larger in each direction.
  • Note that checkboxes use *_background for their images. This is different than buttons. Pay attention. You don't really have the "monolith" or anything here either. The backgrounds are just basic sprite definitions.
  • The image will never be scaled to fit the checkbox.
    • The 'scalable' property has no effect.
    • However, 'scale' can still be used to scale the images manually (e.g. "scale=2" in the sprite definition).
  • The image won't be automatically centered. It'll always be positioned at the top left after auto-cropping.
    • There is an "align" property that has no effect on images (also I think it's only for buttons, not checkboxes).
  • The images are always offset vertically.
    • The exact amount appears to depend on the size of the checkbox and you will have to experiment.
    • You will have to use the 'shift' property in each sprite to account for this. The above uses "shift = {0, -8}" everywhere.
  • If you leave out "checked" you'll just get the base style's little "x", which may be appropriate for you.
With that in mind the above produces the following checkbox:

Image => Image

Immediately you'll notice that the "check" graphic doesn't line up with the button graphic. That's because, as just mentioned, the graphics are auto-cropped and checkboxes can't center the background. So if you're using a background graphic with transparent edges you'll have to adjust the x component of its "shift" property to move it into the correct place. The up-side is that, unlike buttons, the image is no longer stretched.

On the other hand, if your image doesn't have transparent edges, it will line up just fine:

Image => Image

Like buttons, checkboxes also have separate default, hover, click, and disabled graphics. Usage is the same: Use different graphics for each, or pull from a tiled image if you want. I'll leave that example out since it's pretty redundant at this point.

By the way, about the vertical shifting. Here's what happens with the above example if you leave "shift" out:

Image => (I don't have the checked screenshot but same thing happens to the check image)

As you can see, the graphic was shifted below the checkbox's boundaries. Weird, isn't it.

Checkboxes as Buttons

So you can use checkboxes as normal buttons. The most basic use is if you want a non-scaled graphic, as above. This is pretty straightforward. All you need to do is:
  • Create a image file that is just a transparent block, nothing else in it (there might be one in the game already, not sure, I didn't look).
  • Use that image as the "check" image.
And that's it. Checkboxes generate the same GUI click events that buttons do, so handling them in your control code doesn't require any special changes. Since the check mark is invisible, the user will never see that they're toggling the check state (and this has no effect on your control logic). The only small difference when creating checkboxes in your control code is you must supply an initial "state" parameter to add():

Code: Select all

	parent.add({
		type = "checkbox",
		name = "trans-image-checkbox",
		style = "trans-image-checkbox-style",
		state = false    -- <-- this is required for checkboxes (true or false, whatever)
	})
There is another way to use checkboxes. If you want borders and hover/click/etc. backgrounds on all your buttons, it can be a pain to have to generate an entire tile set for each image. Also you may not always have that available, e.g. if you're using game item icons and you want to put them on buttons with borders.

To that end you can use a checkbox as follows:
  • Create a checkbox with your "empty" border/background graphics.
  • Use the "check" graphic for your specific icon (which should have a transparent background).
  • In your control code, ensure that the checkbox is always checked, i.e. force it to checked if the user unchecks it.
This works and produces nice results because checkboxes do center their check images, unlike their background images, and also checkboxes overlay their check images on top of their backgrounds. As far as I know there is no other way in GUI styles to specify an image overlaid on top of another one.

So here's an example, using the explosive cannon shell graphic on top of the game's default slot button graphics. What we've done below is used the graphics the game usually uses for slot_button_styles, and specified our graphic as the check image. Also since the slot graphics are 36x36, we're making a 38x38 button, and the "shift" value has changed to {0,-10} (found experimentally). The tile positions for the backgrounds were copied from the game's default styles.lua.

Code: Select all

data.raw["gui-style"].default["hacky-checkbox-style"] = {
	type = "checkbox_style",
	parent = "checkbox_style",
	width = 38,
	height = 38,
	default_background = {
		filename = "__core__/graphics/gui.png",
		width = 36,
		height = 36,
		shift = { 0, -10 },
		x = 111
	},
	hovered_background = {
		filename = "__core__/graphics/gui.png",
		width = 36,
		height = 36,
		shift = { 0, -10 },
		x = 148
	},
	clicked_background = {
		filename = "__core__/graphics/gui.png",
		width = 36,
		height = 36,
		shift = { 0, -10 },
		x = 184
	},
	disabled_background = {
		filename = "__core__/graphics/gui.png",
		width = 36,
		height = 36,
		shift = { 0, -10 },
		x = 111
	},
	checked = {
		filename = "__image-button-example__/graphics/explosive-cannon-shell.png",
		width = 32,
		height = 32,
		shift = { 0, -10 }
	}
}
So that's our style, then when we create it, we have to remember to set "state=true" so that our graphic displays:

Code: Select all

	frame.add({
		type = "checkbox",
		name = "hacky-checkbox",
		style = "hacky-checkbox-style",
		state = true   -- this is important, it makes our graphic, which is the "check mark", display
	})
And when we handle GUI clicks on it we must remember to force its state back to checked so that the graphic never disappears:

Code: Select all

function handle_checkbox_click (element)

    -- force checkbox state back to true
    element.state = true

    -- blah blah the rest of our code...

end
That'll produce a "button" that looks like this:

Image

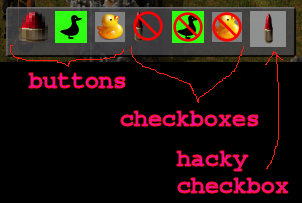
Note that our image is centered (almost, like I mentioned above the shell graphic has a stray pixel on the left but whatever, you can adjust with "shift", but I don't care here), not scaled, and that it's overlaid on top of the game's nice default slot button borders, with hover effects and all. So it's completely saved us the trouble of having to make separate graphics for hover states and such. This also gives you a lot of power to easily change the look-and-feel of your mod (by having only a single image for all button borders and backgrounds) or to make it always match Factorio's theme (by using Factorio's standard GUI graphics). It's also a useful technique for when you're programmatically generating styles from existing entity icons, since you don't need to modify the graphics to provide a border and background.

Mod Update Caveat

This is important. Be aware that, at least right now, if you change button styles to checkbox styles in a mod update, you must change the style names as well, or else you will run into this issue.

-------

So here's the final results you should expect from above (the funky non-centered borders are just from default flow on the frame, outside the scope of this write-up):

Image

Anyways, I hope that that was clear and helpful, and saves some of you guys from all the headaches we went through discovering that. And for those of you who already knew everything here, well, you have my deepest sympathies for the pain you went through to figure it out. :lol:

I wouldn't be surprised if future versions of Factorio change some of this around so I'll try to keep it updated.

If anybody has any corrections, extra info, interesting related hacks, etc. please post below.
Last edited by JasonC on Mon May 09, 2016 2:41 pm, edited 13 times in total.
Took a break from 0.12.29 to 0.17.79, and then to ... oh god now it's 1.something. I never know what's happening.

MrDoomah
Fast Inserter
Fast Inserter
Posts: 196
Joined: Mon Jun 01, 2015 1:11 pm
Contact:

Re: [GUIDE] How to make buttons with images on them.

Post by MrDoomah »

Monoliths have 4 undocumented border properties: top_monolith_border, bottom_*, right_*, left_*. These have no apparent effect.
GUI elements have 4 documented padding properties. These have no apparent effect.
These borders add extra pixels to your image. That's why your 32x32 image ends up as a 34x34 button, it's because the default border value is 1.
(I'm not 100% on that, but that's my experience)

Padding is empty space between the nearby elements. I'm very sure they do have effect.
There is also a "composition", I do not know what it does but it does not seem to be useful in this context.
With a composition image you describe the 4 corners of your image, and factorio will create a button with this information. That's how a 8x8 pixel image can stretch indefinite without creating artefacts.
Inexplicably offset images vertically depending on checkbox size (shift must be used to correct).
Did not know this, finally I can fix the offset buttons in my research queue mod.

Nice guide! Learned something new every day!

JasonC
Filter Inserter
Filter Inserter
Posts: 448
Joined: Tue Mar 22, 2016 3:05 am
Contact:

Re: [GUIDE] How to make buttons with images on them.

Post by JasonC »

MrDoomah wrote:
Monoliths have 4 undocumented border properties: top_monolith_border, bottom_*, right_*, left_*. These have no apparent effect.
GUI elements have 4 documented padding properties. These have no apparent effect.
These borders add extra pixels to your image. That's why your 32x32 image ends up as a 34x34 button, it's because the default border value is 1.
(I'm not 100% on that, but that's my experience)
That was also my guess, but setting them all to 0 doesn't get rid of the border, and setting them all to a larger value doesn't increase the border or have any other noticeable effect either.
Padding is empty space between the nearby elements. I'm very sure they do have effect.
I'm focused on effects within the elements' areas rather than between elements. The goal here would be to get rid of the 1 pixel internal border around the image (note that I define the button's true "area" as the area within which the mouse can interact with it, in the above examples it's a 34x34 area with a 32x32 image centered in it and a frustrating 1-pixel border around the edge). All I know is setting padding to 0 (or -1) didn't get rid of the internal border. I've updated my wording a little to try to be more specific; I hope I didn't cause additional confusion about the padding properties in general.

I wonder what context padding works in. Here for example is the above with padding set to 0 on all elements:

Image

And here it is with padding set to 40:

Image

It didn't have an effect there, so I wonder if it also relies on the flow. Perhaps the default flow doesn't support padding but e.g. tables do.
With a composition image you describe the 4 corners of your image, and factorio will create a button with this information. That's how a 8x8 pixel image can stretch indefinite without creating artefacts.
I'm going to experiment with this now and add the info here. I never ran any controlled experiments with them. This could be really useful if it is what it sounds like it is; perhaps solving the button image scaling issue.

Thanks!!
Took a break from 0.12.29 to 0.17.79, and then to ... oh god now it's 1.something. I never know what's happening.

MrDoomah
Fast Inserter
Fast Inserter
Posts: 196
Joined: Mon Jun 01, 2015 1:11 pm
Contact:

Re: [GUIDE] How to make buttons with images on them.

Post by MrDoomah »

Perhaps padding doesn't work on flows, I don't know. But it does have effects on other elements.
I'm going to experiment with this now and add the info here. I never ran any controlled experiments with them. This could be really useful if it is what it sounds like it is.
If you open __core__/graphics/gui.png and look at the small blobs in the top left corner, those are basically the graphics for all the buttons you see in base factorio. These are 7x7 pixel sizes (The 8th pixel I mentioned before is the gap between images and could be ignored). The code for the very most top left is:

Code: Select all

        type = "composition",
        filename = "__core__/graphics/gui.png",
        priority = "extra-high-no-scale",
        corner_size = {3, 3},
        position = {0, 0}
The corner_size is 3x3, then there is a 1x3 pixel wide for the top frame (or 3x1 for the side frames), and then again a 3x3 corner. This makes a nice 7x7 image with all the information encoded.

JasonC
Filter Inserter
Filter Inserter
Posts: 448
Joined: Tue Mar 22, 2016 3:05 am
Contact:

Re: [GUIDE] How to make buttons with images on them.

Post by JasonC »

MrDoomah wrote:If you open __core__/graphics/gui.png and look at the small blobs in the top left corner, those are basically the graphics for all the buttons you see in base factorio. These are 7x7 pixel sizes (The 8th pixel I mentioned before is the gap between images and could be ignored). The code for the very most top left is:

Code: Select all

        type = "composition",
        filename = "__core__/graphics/gui.png",
        priority = "extra-high-no-scale",
        corner_size = {3, 3},
        position = {0, 0}
The corner_size is 3x3, then there is a 1x3 pixel wide for the top frame (or 3x1 for the side frames), and then again a 3x3 corner. This makes a nice 7x7 image with all the information encoded.
Ohhh, I understand now. That is neat. It can be be useful for the background and frame images in empty/text buttons. Unfortunately it can't be used in checkboxes, since AFAICT they only accept vanilla sprites, and not monoliths or compositions.

I'm not sure if I'm going to work a full description into the guide because of the checkbox limitation, but for now for clarity if anybody is interested: Consider the following 7x7 pixel grid:

Image

Here, for the "composition" from MrDoomah's quote, corner_size specifies the dimensions of the pink areas. The game will then fill the GUI element with an image generated as follows:
  • The corners of the source image will be drawn in the appropriate corners.
  • The green areas will be repeated along the edges.
  • The center pixel will be used as the background.
So with this you can create custom backgrounds / borders in a single image, and it can be applied to any sized button. Neat.

The "position" field is conceptually the same as "x" and "y" in the usual sprite definition. It specifies where in the source image to take the data from, for use in tiled images. The size is presumably computed from this, so corner width * 2 + 1 by corner_height * 2 + 1 is the expected size of your graphic.

I've added a full example to the example code, which uses the following graphic:

Image

To produce a button with round corners and highlight effects:

Image
Took a break from 0.12.29 to 0.17.79, and then to ... oh god now it's 1.something. I never know what's happening.

Koub
Global Moderator
Global Moderator
Posts: 7175
Joined: Fri May 30, 2014 8:54 am
Contact:

Re: [GUIDE] How to style buttons with images on them.

Post by Koub »

[Koub] Topic stickied
Koub - Please consider English is not my native language.

judos
Filter Inserter
Filter Inserter
Posts: 266
Joined: Mon Dec 08, 2014 11:17 am
Contact:

UPDATE 0.12.33

Post by judos »

I implemented this for Factorio 0.12.29. When I updated to 0.12.33 I saw that everything is broken again :(

So I tried a bit around and figured out the gui displays only 17x17px so I tried using scale property and this seems to work:
Only drawback: Icon image is now longer centered on the checkbox somehow.

Code: Select all

-- See this very helpful topic as reference: https://forums.factorio.com/viewtopic.php?f=34&t=24007

local function addStyle(name,icon,iconSize)
	data.raw["gui-style"].default[name] = {
		type = "checkbox_style",
		parent = "checkbox_style",
		width = 36,
		height = 36,

		default_background = {
			filename = "__core__/graphics/gui.png",
			width = 36,
			height = 36,
			scale = 2.12,
			shift = { 10, 0 },
			x = 111
		},
		hovered_background = {
			filename = "__core__/graphics/gui.png",
			width = 36,
			height = 36,
			scale = 2.12,
			shift = { 10, 0 },
			x = 148
		},
		clicked_background = {
			filename = "__core__/graphics/gui.png",
			width = 36,
			height = 36,
			scale = 2.12,
			shift = { 10, 0 },
			x = 184
		},
		disabled_background = {
			filename = "__core__/graphics/gui.png",
			width = 36,
			height = 36,
			scale = 2.12,
			shift = { 10, 0 },
			x = 111
		},
		checked = {
			filename = icon,
			align = "center",
			width = iconSize,
			height = iconSize,
			shift = { 1, 0 },
		}
	}
end

for typename, sometype in pairs(data.raw) do
	local _, object = next(sometype)
	if object.stack_size or typename == "fluid" then
		for name, item in pairs(sometype) do
			if item.icon then
				addStyle("item-"..name,item.icon,32)
			end
		end
	end
end
addStyle("item-empty","__hardCrafting__/graphics/entity/empty.png",1)
And the result in 0.12.33:
demo.PNG
demo.PNG (447.88 KiB) Viewed 13715 times

JasonC
Filter Inserter
Filter Inserter
Posts: 448
Joined: Tue Mar 22, 2016 3:05 am
Contact:

Re: [GUIDE] How to style buttons with images on them.

Post by JasonC »

@judos, Nice! When you adjust the scaling setting in graphics options, with 0.12.31+, does it still work out?

The centering is weird. I haven't done enough tests to figure out what's actually going on there either. My hypothesis is that it's trying to center the check over the scaled bounding box (or scaling is somehow messing with the bounding box in another subtler way) and so it doesn't have enough room to do it. But that theory has a lot of holes in it. I intend to investigate after scaling-related changes in the experimental updates settle down and file a proper bug report if appropriate.

Btw, good news for image buttons in 0.13. I'm still a fan of layered images with regular buttons, as opposed to a specific widget, but it'll still be a really helpful addition.
Took a break from 0.12.29 to 0.17.79, and then to ... oh god now it's 1.something. I never know what's happening.

judos
Filter Inserter
Filter Inserter
Posts: 266
Joined: Mon Dec 08, 2014 11:17 am
Contact:

Re: [GUIDE] How to style buttons with images on them.

Post by judos »

@JasonC: I just tested the gui scaling and it works pretty good. The item is maybe 1-2 pixels offset, but I consider this still pretty usable until we have the 0.13 out :P
See these screenshots (50% gui scale, 120% gui scale)
demo3.PNG
demo3.PNG (49.71 KiB) Viewed 13685 times
demo2.PNG
demo2.PNG (232.25 KiB) Viewed 13685 times

Zeblote
Filter Inserter
Filter Inserter
Posts: 973
Joined: Fri Oct 31, 2014 11:55 am
Contact:

Re: [GUIDE] How to style buttons with images on them.

Post by Zeblote »

More like 5-10 pixel offset, that doesn't look nice at all!

judos
Filter Inserter
Filter Inserter
Posts: 266
Joined: Mon Dec 08, 2014 11:17 am
Contact:

Re: [GUIDE] How to style buttons with images on them.

Post by judos »

Well do you have a proposal how to fix it then? I didn't find any way to do it. And as I mentioned it's only until 0.13 where it will definitely be better.

quenenni
Inserter
Inserter
Posts: 21
Joined: Fri Apr 14, 2017 2:16 am
Contact:

Re: [GUIDE] How to style buttons with images on them.

Post by quenenni »

Hello,

I didn't see that post before and it seems lots of style specialists are around here that was always my Achille's heel).
I have a problem with images I show in the gui.

All images (recipes, ..) are with a good size except the images from technologies.. They are huge compared to the others.
I don't know how to reduce them.

* I thought of creating a "css class" (data:extend...), but we have to put a path to the image and that won't do as I must be able to show all the techs images, even the techs coming from mods, and so it's very unpractical to create a class for each, and I'll have to update my mod all the time.. Not the path I want to take.

* I tried to play with a maximum_height on the sprite element and on the table containing the sprite. The height is then correct when setting the sprite style, but the image is not scaled and thus, it 's horrible. And it doesn't change anything when applying on the table.

After having read your excellent post, a new idea came to mind.

My problem is that, for a sprite element, you have the sprite attribute where you can give the path to the image (what I'm doing currently) or you can give the name of a class defined with data:extend.. So it's one or the other..

My question is, is there a way to have a style class for only managing the size / scale of the picture, but without defining the path to the image. Then, use the style attribute to set this style class, and have the path to the picture set in the sprite attribute?

My mod is working already nicely, I just need to stress test it a bit before showing it to the world (full of aliens), except for this @#¼@#¼ tech image that makes the look quite ugly :/

If anyone could help with that particular problem, I'll be very very very grateful (I already spent too many hours just for this problem, and I'm starting to feel frustrated).

Thanks

User avatar
darkfrei
Smart Inserter
Smart Inserter
Posts: 2903
Joined: Thu Nov 20, 2014 11:11 pm
Contact:

Re: [GUIDE] How to style buttons with images on them.

Post by darkfrei »

Is it possible to use just vanilla GUI style like

Code: Select all

data.raw["gui-style"].default.image_tab_slot_style
or

Code: Select all

data.raw["gui-style"].default.slot_button_style
?

User avatar
Klonan
Factorio Staff
Factorio Staff
Posts: 5148
Joined: Sun Jan 11, 2015 2:09 pm
Contact:

Re: [GUIDE] How to style buttons with images on them.

Post by Klonan »

darkfrei wrote:Is it possible to use just vanilla GUI style like

Code: Select all

data.raw["gui-style"].default.image_tab_slot_style
or

Code: Select all

data.raw["gui-style"].default.slot_button_style
?
If you want to use a already defined style in your script it is simple:

Code: Select all

gui.add{
  type = "sprite-button",
  style = "slot_button_style",
  sprite = "item/iron-plate"
}

User avatar
darkfrei
Smart Inserter
Smart Inserter
Posts: 2903
Joined: Thu Nov 20, 2014 11:11 pm
Contact:

Re: [GUIDE] How to style buttons with images on them.

Post by darkfrei »

Klonan wrote:If you want to use a already defined style in your script it is simple:

Code: Select all

gui.add{
  type = "sprite-button",
  style = "slot_button_style",
  sprite = "item/iron-plate"
}
Thanks a lot! Simple and perfect!

Code: Select all

tab.add{type = "sprite-button", style = "slot_button_style",  name = value, sprite  = "item/" .. value}
2017-07-31 21_44_12.png
2017-07-31 21_44_12.png (105.36 KiB) Viewed 11265 times
How to define style of table like in vanilla? And pop-up, how to add some text, for example the name of selected item?


Now I haven't any style

Code: Select all

player.gui.left.frameCreative.add{type ="table", name = "tabCreative", colspan = 31}

User avatar
Klonan
Factorio Staff
Factorio Staff
Posts: 5148
Joined: Sun Jan 11, 2015 2:09 pm
Contact:

Re: [GUIDE] How to style buttons with images on them.

Post by Klonan »

darkfrei wrote:
Klonan wrote:If you want to use a already defined style in your script it is simple:

Code: Select all

gui.add{
  type = "sprite-button",
  style = "slot_button_style",
  sprite = "item/iron-plate"
}
Thanks a lot! Simple and perfect!

Code: Select all

tab.add{type = "sprite-button", style = "slot_button_style",  name = value, sprite  = "item/" .. value}
2017-07-31 21_44_12.png
How to define style of table like in vanilla? And pop-up, how to add some text, for example the name of selected item?


Now I haven't any style

Code: Select all

player.gui.left.frameCreative.add{type ="table", name = "tabCreative", colspan = 31}
Something like this:

Code: Select all

player.gui.left.frameCreative.add{
  type ="table",
  name = "tabCreative",
  colspan = 31,
  style = "slot_table_style"
}
And for the tooltips:

Code: Select all

tab.add{
  type = "sprite-button",
  style = "slot_button_style", 
  name = value,
  sprite  = "item/" .. value,
  tooltip = game.item_prototypes[value].localised_name
}
You should cache the item_prototypes before you loop through to add all the buttons:

Code: Select all

local items = game.item_prototypes
Just for speed/efficiency
Tooltip can be any string or LocalisedString

User avatar
darkfrei
Smart Inserter
Smart Inserter
Posts: 2903
Joined: Thu Nov 20, 2014 11:11 pm
Contact:

Re: [GUIDE] How to style buttons with images on them.

Post by darkfrei »

Klonan wrote:You should cache the item_prototypes before you loop through to add all the buttons:

Code: Select all

local items = game.item_prototypes
Just for speed/efficiency
Tooltip can be any string or LocalisedString
It was added to the global, but with nothing.

Code: Select all

		local i = 1
		global.item_list_with_nothing[i] = "nothing"
		
		for k, item in pairs (game.item_prototypes) do  
			i = i + 1
			global.item_list_with_nothing[i] = item.name
			global.items[item.name] = item
		end

Rseding91
Factorio Staff
Factorio Staff
Posts: 13171
Joined: Wed Jun 11, 2014 5:23 am
Contact:

Re: [GUIDE] How to style buttons with images on them.

Post by Rseding91 »

Since there's now the image button widget I don't believe this needs to be pinned still. Unless someone objects I'm going to un-pin it.
If you want to get ahold of me I'm almost always on Discord.

Post Reply

Return to “Modding discussion”