Large guide to modding Factorio
Posted: Thu May 28, 2015 5:07 am
Alright so I have been checking out a lot of info on out there on the forum as well as in the wiki and I have been doing my own tests. This will be my attempt to make a very large mod to explain a large number of concepts for modding because the wiki doesn't have the best info on modding and even the best guides I have found, while they are quite good, are still lacking quite a lot. So let's get this thing started:
Chapter 1: The file system
There are a couple ways you can setup your files and folders, but I'm quite fond of one in particular so I will focus on that.
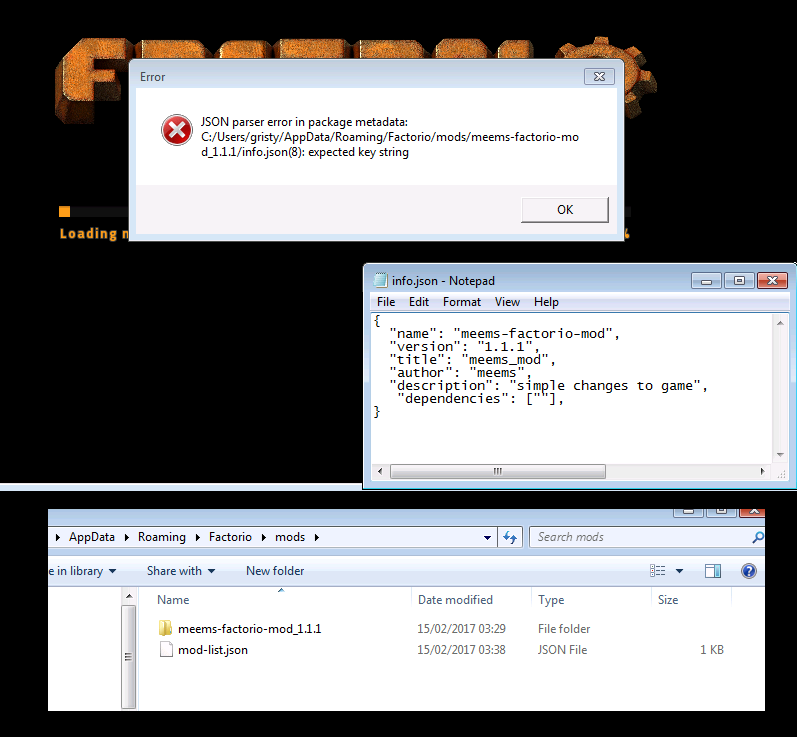
As was mentioned, you have a file called info.json in your mod's folder. This file is basically just for telling Factorio (and everybody else) about your mod. Go ahead and open up the file with some kind of text editor (I prefer notepad++, but anything should work fine). Go ahead and input all this (copy and paste) into the file:
Now let's go over this. The name line is simple enough; go ahead and input (in the quotes of course) the exact same name you gave to your mod's folder. This has to be the same in order for Factorio to accept your mod although it does need to be missing the underscore and version in other words from our previous example you would just input foo-bar-mod. Next is the version...quite obvious, just put in the version such as 1.2.3. Now we come to the title, this is where you put in what you actually call the mod for example: foo bar mod. You can input spaces and whatever, it's your name. Next is the author, soooooo you. Now we have the description, this is where you get to put a quick description about your mod. There is no particular thing you should put there so whatever you think is a good short...short description is fine. Finally we have the dependencies. If your mod relies on any other mod (even a certain version of the base mod) then this is where you put it. It follows a simple format. Let's say you needed the foo mod at at least version 0.2.0, the bar mod at exactly version 1.0.1 if it is active and the foobar mod of any version then it would look like this:
Now you can delete some of these lines. name, author, version and title are the only required fields (unless you have dependencies). You can get rid of everything else if you want. I also want to mention that there is a homepage line that you can put in there, but I haven't messed with it and if you have a website for your mod then you probably don't need to read a guide on making a mod.
Chapter 3: Items
Alright so you probably want to make some items for you mod. Well here we can talk about the prototypes folder. The prototypes folder has to do with what are called prototypes in Factorio. https://forums.factorio.com/wiki/inde ... efinitions is a (quite incomplete) list of prototypes. Basically a prototype is something to define a list of properties about a given item/entity. Inside the prototypes folder you want to create a file named item.lua. This is the file where you will put all the descriptive code about your mod's items. Go ahead and open item.lua in your preferred text editor. Now let me explain the basic way to create an item.
First you want to place this to surround all the rest of your code:
Now inside of there is where you are going to create all of your items. To create an item you use the following format:
First off we have the type. Type will always be item for an item. When we get to entities it will be a prototype and for recipes it is recipe. It's not complex until you deal with prototypes. Name is just the name of the item. Be careful, this isn't the name that you necessarily want the player to see, this is just the name that you will use in all the rest of your code to reference this item. Also make sure you replace all spaces with dashes in the name. Icon is the path to the image that will be used to represent this item. Always start off the path with "__mod-name__" (two underscores on both sides and the name of your mod in between). This will get the path to your mod's folder for you. The rest is the path to where the image is which will hopefully be in the graphics folder. I like to make a 32x32 image, but technically you can use just about any size you fancy. I also prefer using GIMP for my image editing because it allows me to make the background invisible (unlike paint). Flags has a total of two possible values you can insert: "goes-to-quickbar" or "goes-to-main-inventory". The two different flags are pretty obvious, when you pick up an item does it go to your quickbar or your inventory? Next up we have the subgroup. I'm a little sketchy on the subgroup because there is also a group setting and it gets weird, but let me just say that I know it decides what tab in the crafting window the item falls under. If you don't choose a group/subgroup then it will just be in a new tab called "?" and you can make your own groups/subgroups. Finally we come to stack_size. This is pretty self explanatory, but basically it just decides how many of this item you can stack into a single space of your inventory. There are more options you can add so here is a quick link to the wiki https://forums.factorio.com/wiki/inde ... otype/item. Note, the wiki needs a lot of work on its modding sections. Also one main thing I managed to leave out of my above code is the place_result option. Whatever you set it equal too will be the name of the entity you get when you place the item on the ground. Quick fyi: any name of any item or entity needs to replace the spaces with dashes.
Chapter 4: Entities
Oh god. This is a big subject that I cannot cover anywhere near as well as the previous (and latter with the exception of the control.lua part) sections. First off you need to realize that every single thing that exists on the map (except the land itself which is considered tiles and will not be covered in this guide) is an entity. Every tree, building, turret, enemy and even you. An entity refers to any object that is not in an inventory (and is not a tile). Every item that won't just be like equipment or a module (basically any item that will be put on the ground at any point) needs to have an entity that it is attached to. Creating an entity can be pretty complex. It can be especially infuriating when you want to create something completely different from anything already in the game. Let's have a quick rundown of the basics that every entity needs:
Chapter 5: Recipes
Now create a recipe.lua file in your prototypes folder. Again surround your code with the usual. Now recipes are quite a bit easier.
Alright so this is an easy description. Type is simple enough, recipe. Once again name is really easy and the same as the name for the item that this recipe creates. The enabled option has two possible states, "true" and "false". This decides whether the recipe is available to be crafted or not. A good exampled (and probably the only one) for why you would initially have it disabled is for an item that needs to be researched before it can be crafted. The ingredients option leads to a table that tells what all items are required to craft this recipe. In this case we only need 100 iron sticks to craft the foobar. You can expand this by adding more items (though their format needs to be exactly the same as the iron sticks' format). To find out the name you need to use you can just take the actual name of the item in game and then replace the spaces with dashes (and always use lower case). Finally the result just tells what item is made when you complete the recipe. You can of course set it up to make multiple of the item or of other items (?). I haven't ever done that and have done no research on it, but if you are really curious then just look it up or go into the base folder and look at their recipe.lua. This is a good time to mention that you can look at the base mod as well as any other mod that anyone else has created to get some good ideas as well as just a feel for how all of this works.
Chapter 6: Technology
This is similar to recipes (it's basically just recipes with slightly different parameters). Create technology.lua in your prototypes folder and start with the normal code.
Alright so let's explain this quickly. Type is obvious. Name is just what you want this tech to be called in your files (not necessarily in the game). Icon is obvious. Effects allows you to choose what items are unlocked by researching this. You can add more effects in that table for more items to be unlocked. The type for the effect is always the same and the recipe just has to be the same as the name you gave that particular recipe. Prerequisites tells you what technologies you have to have already researched. The unit table allows you to choose what all science packs are required to research the tech as well as how long it will take. The ingredients is just the same as for the recipes except that you are using science packs instead of any resource. The count variable decides how many iterations you have to go through using the number of science packs that the ingredients call for. The time variable decides how long it takes a lab to go through one iteration. Again if you need any help I would recommend looking at code from other mods as that might help you out.
Chapter 7: Names/locale folder
Alright so let's move over to the locale folder you created and then into the en (or whatever language) folder. This part is extremely simple. This is where you get to place the actual names that your stuff will have in the game. There are different ways you can do this. You could just make a file called local.cfg or something similar and then put all the code in there, but I prefer a different method that is better for larger mods. Create three different files: item.cfg, entity.cfg and tech.cfg. In each one you will follow a simple format. At the top write [item-name] and then just write the item name and then the name you want the item to have in the game like this: foo-bar=foo bar. You can also, at some point, write [item-description] and then below that write the same things except that you put the wanted description instead of the wanted name. For the other files you do the same thing except you replace item with technology or entity. That's all there is to it.
Chapter 8: data.lua
Remember that data.lua that you made a while back in your mod's folder? Yeah we are just now getting to it. Technically you can put all of the info you put for your items and entities and recipes and so on into this file, but I prefer this method of breaking everything up. It makes it a lot easier to read and understand. All you have to do here is add some required stuff. Basically the only things you need to worry about including in here is all the files you put in your prototypes folder. Here is an example of what it might look like:
Not exactly very difficult. If you add more files to the prototypes folder you may need to include those as well (keep in mind this is only looking for lua files). I think you also have to include migration scripts in here, but I'm not sure.
Chapter 9: Migration scripts
Alright so I know I said I don't know a lot about this stuff, but I did a little research and so I know a bit. Basically a migration script is used for when you are updating your mod and you decide to change items. Obviously there could be people who were using your mod and so their save has some of these items that you have discarded. The migration script allows you to tell Factorio to change these items in their save to one of your new items. I don't really know anything further than that. Here is what I used to discover this https://forums.factorio.com/forum/vie ... 749#p21749.
Chapter 10: control.lua and lua script
Oh dear lord help me now. This is the one section that will be even worse than the entities. Alright so let's take a look at your mod's folder. See that control.lua I had you make a long time ago? Yeah it feels like ages doesn't it? Alright let's open it up and in the process open the can of worms that it is. So this is where you get to actually make your stuff do stuff. First off make sure to write this at the top:
You may not use one of these or perhaps neither, but who cares they can be useful. Basically these are just a couple of libraries that open up more commands to you. Now at this point let me just tell you that I'm not going to sit here and teach you lua. There are plenty of well made guides and tutorials on that so go search for that stuff. Basically this is where you are going to combine normal lua with all the stuff that Factorio has. I'm not even going to begin trying to describe all of the commands you have so let me just refer you to the wiki (although it's absolutely terrible at explaining this stuff too) https://forums.factorio.com/wiki/inde ... Lua/Events https://forums.factorio.com/wiki/inde ... e=Lua/Game. Those should give you very very slightly decent info to get you started on what all the lua code portion of modding is all about. Like I said I'm gonna try to see if I can't update some of the stuff on the wiki because even most of the stuff it does explain is not explained well enough in my opinion.
Alright that was all I got (I do believe I covered just about everything). I do want to say that I probably made mistakes or didn't explain some stuff well enough so please let me know (I want this to be quite expansive, but the further I went on the harder that became). If you have any questions than please feel free to ask (I know I said you can look at the code of other mods and learn a lot, but you don't have to do that before you ask me a question). I would like to recommend the following tutorials because they each have their own unique uses (I'm definitely not trying to say that mine is better than either because it probably isn't, but I am saying that neither of these is in anyway perfect) https://forums.factorio.com/wiki/inde ... g_Tutorial https://forums.factorio.com/forum/vie ... f=34&t=709 (really like this one even though it is based on the wiki). I will hopefully be able to start "fixing" the wiki pretty soon so that it becomes a lot more noob friendly for learning how to mod because it is currently just a whole bunch of trial and error for figuring out how some of this stuff works. Regardless I hope you guys will now start pointing out all the flaws in my writing .
.
Chapter 1: The file system
There are a couple ways you can setup your files and folders, but I'm quite fond of one in particular so I will focus on that.
- Create a folder in your Factorio mods directory. You can find your mods directory by going to your Factorio folder and clicking the shortcut to the mods folder.
- Name this folder according to a special format. Let's say you wanted to name your mod foo bar mod and you were making version 1.2.3 (there needs to be 3 numbers). You would name your folder the following foo-bar-mod_1.2.3. The general format is to have your mod's name, with spaces being replaced by dashes, followed by an underscore and then the version.
- Inside this folder (which shall now be known as your mod's folder, not mods but mod's) you will create three files: info.json, data.lua and control.lua.
- Depending on your mod you may also want the following folders in your mod's folder: graphics, prototypes, locale and migrations (I don't really know what migrations is for).
- Inside of the graphics folder you will want an icon folder and an entity folder (I will explain all of this stuff later).
- Inside of the locale folder you will want an en folder (stands for english or you can have whatever language).
- There are other assorted files and folders, but it quickly becomes highly dependent on what kind of mod you are making.
As was mentioned, you have a file called info.json in your mod's folder. This file is basically just for telling Factorio (and everybody else) about your mod. Go ahead and open up the file with some kind of text editor (I prefer notepad++, but anything should work fine). Go ahead and input all this (copy and paste) into the file:
Code: Select all
{
  "name": "",
  "version": "",
  "title": "",
  "author": "",
  "description": "",
   "dependencies": [""],
}Code: Select all
"dependencies": ["foo >= 0.2.0", "? bar = 1.0.1", "foobar"]Chapter 3: Items
Alright so you probably want to make some items for you mod. Well here we can talk about the prototypes folder. The prototypes folder has to do with what are called prototypes in Factorio. https://forums.factorio.com/wiki/inde ... efinitions is a (quite incomplete) list of prototypes. Basically a prototype is something to define a list of properties about a given item/entity. Inside the prototypes folder you want to create a file named item.lua. This is the file where you will put all the descriptive code about your mod's items. Go ahead and open item.lua in your preferred text editor. Now let me explain the basic way to create an item.
First you want to place this to surround all the rest of your code:
Code: Select all
data:extend({

})Code: Select all
{
type = "item",
name = "foobar",
icon = "__foo-bar-mod__/graphics/icons/foobaricon.png",
flags = {"goes-to-quickbar"},
subgroup = "ammo",
stack_size = 100,
},Chapter 4: Entities
Oh god. This is a big subject that I cannot cover anywhere near as well as the previous (and latter with the exception of the control.lua part) sections. First off you need to realize that every single thing that exists on the map (except the land itself which is considered tiles and will not be covered in this guide) is an entity. Every tree, building, turret, enemy and even you. An entity refers to any object that is not in an inventory (and is not a tile). Every item that won't just be like equipment or a module (basically any item that will be put on the ground at any point) needs to have an entity that it is attached to. Creating an entity can be pretty complex. It can be especially infuriating when you want to create something completely different from anything already in the game. Let's have a quick rundown of the basics that every entity needs:
- Start by making a file called entity.lua in your prototypes folder
- Encompass all the code in the file just like in the item.lua file with
Code: Select all
data:extend({ }) - Enter the type option again (this is mandatory) which I will explain more in a minute
- Enter the name option (remember to replace spaces with dashes)
- Enter all the other stuff
Good advice. Once you have chosen a prototype to use for you entity you will want to go to the base mod and check out the code that they used for the specific entity/prototype that you chose. Like I have been saying, looking at code from other mods (including the base mod) can really help you out with your own code.DaveMcW wrote:Re: Chapter 4: Entities
After you pick a prototype, you should look for a similar prototype in Factorio/data/base/prototypes/entity. Then use that as a reference for the fields you need to add.
Chapter 5: Recipes
Now create a recipe.lua file in your prototypes folder. Again surround your code with the usual. Now recipes are quite a bit easier.
Code: Select all
{
    type = "recipe",
    name = "foobar",
    enabled = "true",
    ingredients =
    {
      {"iron-stick",100},
    },
    result = "foobar"
},Chapter 6: Technology
This is similar to recipes (it's basically just recipes with slightly different parameters). Create technology.lua in your prototypes folder and start with the normal code.
Code: Select all
{
      type = "technology",
      name = "foobartech", --lol foobar tech.  Let's learn how to *bleep* things up beyond all repair
      icon = "__foobar__/graphics/icons/foobartech.png",
      effects =
      {
        {
            type = "unlock-recipe",
            recipe = "foobar"
        },
      },
      prerequisites = {"foo", "bar"},
      unit =
      {
        count = 10,
        ingredients =
        {
          {"science-pack-1", 2},
          {"science-pack-2", 1},
        },
        time = 10
      }
}Chapter 7: Names/locale folder
Alright so let's move over to the locale folder you created and then into the en (or whatever language) folder. This part is extremely simple. This is where you get to place the actual names that your stuff will have in the game. There are different ways you can do this. You could just make a file called local.cfg or something similar and then put all the code in there, but I prefer a different method that is better for larger mods. Create three different files: item.cfg, entity.cfg and tech.cfg. In each one you will follow a simple format. At the top write [item-name] and then just write the item name and then the name you want the item to have in the game like this: foo-bar=foo bar. You can also, at some point, write [item-description] and then below that write the same things except that you put the wanted description instead of the wanted name. For the other files you do the same thing except you replace item with technology or entity. That's all there is to it.
Chapter 8: data.lua
Remember that data.lua that you made a while back in your mod's folder? Yeah we are just now getting to it. Technically you can put all of the info you put for your items and entities and recipes and so on into this file, but I prefer this method of breaking everything up. It makes it a lot easier to read and understand. All you have to do here is add some required stuff. Basically the only things you need to worry about including in here is all the files you put in your prototypes folder. Here is an example of what it might look like:
Code: Select all
require("prototypes.technology")
require("prototypes.entity")
require("prototypes.item")Chapter 9: Migration scripts
Alright so I know I said I don't know a lot about this stuff, but I did a little research and so I know a bit. Basically a migration script is used for when you are updating your mod and you decide to change items. Obviously there could be people who were using your mod and so their save has some of these items that you have discarded. The migration script allows you to tell Factorio to change these items in their save to one of your new items. I don't really know anything further than that. Here is what I used to discover this https://forums.factorio.com/forum/vie ... 749#p21749.
Chapter 10: control.lua and lua script
Oh dear lord help me now. This is the one section that will be even worse than the entities. Alright so let's take a look at your mod's folder. See that control.lua I had you make a long time ago? Yeah it feels like ages doesn't it? Alright let's open it up and in the process open the can of worms that it is. So this is where you get to actually make your stuff do stuff. First off make sure to write this at the top:
Code: Select all
require "util"
require "defines"Alright that was all I got (I do believe I covered just about everything). I do want to say that I probably made mistakes or didn't explain some stuff well enough so please let me know (I want this to be quite expansive, but the further I went on the harder that became). If you have any questions than please feel free to ask (I know I said you can look at the code of other mods and learn a lot, but you don't have to do that before you ask me a question). I would like to recommend the following tutorials because they each have their own unique uses (I'm definitely not trying to say that mine is better than either because it probably isn't, but I am saying that neither of these is in anyway perfect) https://forums.factorio.com/wiki/inde ... g_Tutorial https://forums.factorio.com/forum/vie ... f=34&t=709 (really like this one even though it is based on the wiki). I will hopefully be able to start "fixing" the wiki pretty soon so that it becomes a lot more noob friendly for learning how to mod because it is currently just a whole bunch of trial and error for figuring out how some of this stuff works. Regardless I hope you guys will now start pointing out all the flaws in my writing